Note: this article is designed for readers using an SLR camera � one with interchangeable lenses. A basic understanding of how a camera works is helpful, but not necessary.
So you�re a fan of the pictures spread throughout the wakeboarding mags each month. The only day the mailbox has any significance in your life is the day the new mag arrives. Cover-to-cover you sit and read. But, for you, nothing is better than the art. You stare and wonder, �How the hell did the photographer take that shot, and why can�t I do that?�
First of all, you can do that (with practice and a general knowledge of photography), and hopefully this article will help you learn how.
Basic Photography
Before we delve into combining photography with wakeboarding, we�ve got to start with some basic photography lessons.
Photography is literally the capturing and recording of light onto a light sensitive plane of film (or now digital sensors). There are two basic functions that affect/control how much light hits the plane: shutter speed and aperture.
Shutter Speed. The faster the shutter closes the less light will hit the film. If the shutter is slower, it is open longer and allows more light to come through.
Aperture. A lens�s aperture is much like the pupil of your eye. The smaller the hole, the less light that will hit the film. The size of an aperture is referred to as an f-number or f-stop. You will frequently see labels like f1.4, f5.6, and f16 � these are all different f-stops. Out of these three apertures, f1.4 would allow the most light, f16 the least.
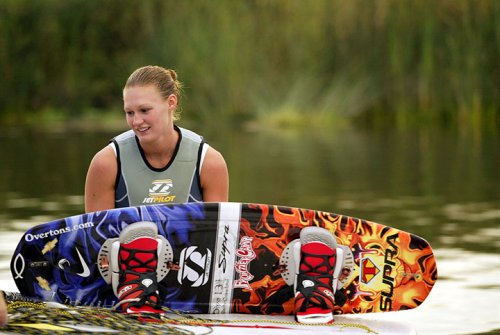
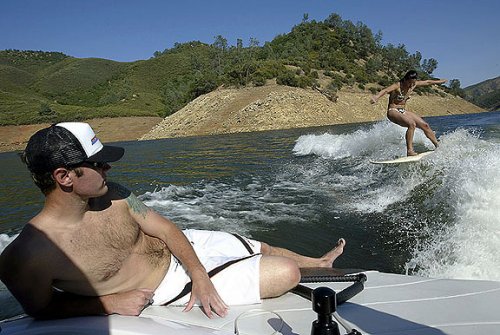
A second, and very, very important feature of a lens�s aperture is depth of field. The depth of field of a picture is the amount of the frame in focus or sharp. An f-stop of 1.4 has an extremely shallow depth of field, meaning only what you focus on will be sharp, the rest of the frame will be soft and out of focus. A picture taken at f16 will have a much deeper depth of field, meaning what you focus on, as well as much of the foreground and background will appear sharp. Depth of field is also affected by what lens you choose and how far you are away from the subject. The shorter the focal length (zoom) of the lens, the greater the depth of field. The greater the distance from your camera to the subject, the greater the depth of field, as well.
Here are two examples for depth of field:
Emily Copeland: shallow depth of field
f2.8
Greg & Evelyn: large depth of field
f10
*Terminology note: Aperture and f-stops can be very confusing at first and hard to understand the terminology. Here is an overview to help.
On early cameras the aperture was adjusted by individual metal �stop� plates that had holes of different diameters. The term �stop� is still used to refer to aperture size, and a lens is said to be �stopped down� when the size of the aperture is decreased. The standardized, full-stop of series numbers on the f-stop scale runs as follows: f/1, f/1.4, f/2, f/2.8, f/4, f/5.6, f/8, f/11, f/16, f/22, f/32, f/45, f/64. Many lenses and cameras have the option to change f-stops in full stops, half stops and third stops (e.g. f2.8, f3.2, f3.5, f4). The largest of these, f/1, allows the most light. Each f-stop after that admits half the light of the previous one. A lens with a larger aperture is said to be �faster.� A lens that opens up to f1.4 is said to be faster than one that can only open up to f2.8. On many lenses there is a �floating� aperture. For example, a common lens in the consumer market with a floating aperture is the 75-300mm f4.5-5.6. This means that at 75mm the lens can open up to f4.5, but if zoomed out to 300mm, the lens can only open up to f5.6 � losing two thirds stops of light.
The third thing affected by the light is the film. Film speeds, known as ISO, are what determine your shutter speed and aperture. Slower film (e.g. ISO 100) requires more light to be properly exposed, whereas faster film (e.g. ISO 3200) requires much less. To be specific ISO 3200 film requires five less stops of light than ISO 100 film. The full-stops of film are 100, 200, 400, 800, 1600, 3200, but many modern cameras (including digital) can be set at half or third stops for film speed. Slower speed films (100 and 200) would be used in high light situations, while faster speed films would be used in lower light situations. Higher speed films are also grainier than slower speed films, especially when images are blown up into large prints/files.
*Terminology note: Stops. A �stop� in camera talk is basically a change in setting for one of the three items above � shutter speed, aperture, and film speed. A full-stop in shutter speed is 1/500 sec to 1/1000 sec. A full-stop in aperture is f1.4 to f2.8. A full-stop in film speed is ISO 100 to ISO 200. Each of these can be referred to in full, half or third stops. For example, �I opened my aperture half a stop,� or �I bumped up the shutter speed two stops.�
Applying it to Wakeboarding
So we�ve established a rough foundation for understanding photography and how to control the light coming into our camera. Let�s now take those shutter speeds, f-stops, film speeds, and the depth of field and apply it to some wakeboarding action.
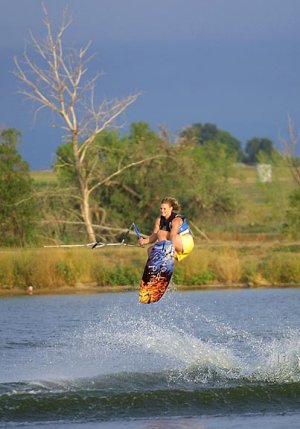
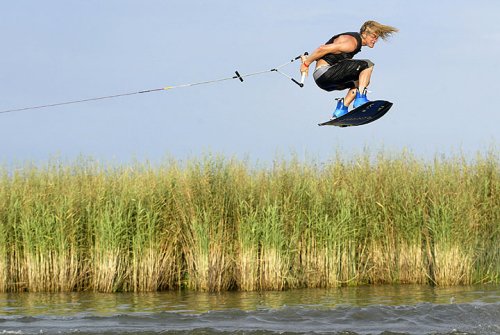
Time of day: If you want your pictures to look like the ones in the magazines you�ve got to shoot at the same time the pros do. There are two times during the day to get good light, dawn and dusk. The period right after sunrise and right before sunset are referred to as the �golden hours� of photography. When the sun is low on the horizon the light is very warm, and because it is coming from the side, it fills in the picture nicely. During the afternoons when the sun is high in the sky pictures can be very unflattering. The light source is now coming from above and casting harsh shadows across the rider�s face, often causing the picture to appear flat because light isn�t filling the subjects as well.
Time Of Day:
Warm morning light in Colorado
ISO 200, 1/2000 sec @ f2.8
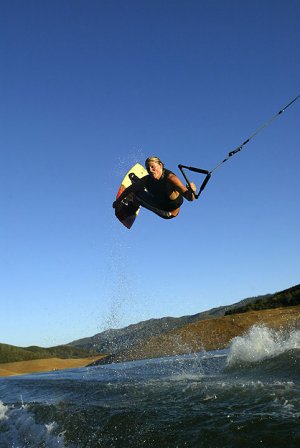
Harsh afternoon light on the Delta
ISO 200, 1/2000 sec @ f7.1
Camera settings: Of course you are going to want the best looking picture possible, this starts with the film. With wakeboarding, photographers almost always use ISO 100 or 200 film - the colors are rich and the film is less grainy. These film speeds are slower so, as we now know, they require more light to be properly exposed. To do this we will stop our aperture down anywhere from f2.8 to f4.5. This is convenient because it creates a shallow depth of field, separating the in-focus rider away from the out-of-focus background. Imagine if the picture of Emily above was shot at f16 instead of f2.8. The grass and trees in the background would appear sharp and Emily would blend in with them, making the picture appear much more cluttered. Now, because we are allowing in so much light with our large aperture, we are going to need to compensate by using a fast shutter speed, which, again is convenient because wakeboarding is a fast-action sport and you will normally want a high shutter speed to freeze the rider.
The typical setting in my camera while doing a photo shoot is similar to the settings for the picture of Emily: ISO 100-200, f2.8-f4, 1/2000-1/4000 sec. This is a good place to start while starting out on wakeboarding photography.
One of the most important things when adjusting your camera�s settings is the light meter. Every camera has a light meter built into it and most are visible inside the viewfinder. The light meter will tell you if the settings of your camera are underexposed, overexposed, or correct for the subject you are shooting. Learn how to read your light meter! Make sure that what your light meter is reading, however, is what you want to turn out in the picture. If the meter is reading off of a shadow over the water, you will slow your camera down because the meter will think it is dark. The shadow will be properly exposed and turn out quite nicely in the picture, but everything else will be blown out. If you meter off a well lit hillside and speed your settings up, the hillside will be nicely exposed, but everything else (including your subject) will be quite dark.
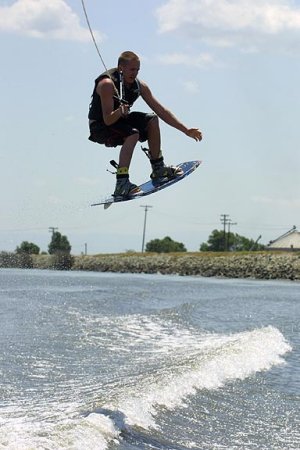
Angles: The best way to get cool, different looking pictures is to get out of the boat and shoot from a different angle. Pros use a variety of different angles during photo shoots: from a tube, in a chase boat, from land, in a sitting duck position, from a helicopter; or, if none of these are options, just climbing up on the tower will provide a different angle than the straight, in-the-boat shot.
From the towboat: The most common place to take wakeboarding pictures is obviously the towboat. Many times, when you�re just hanging out for a day on the water with buddies it�s the only option. Here are some suggestions about how to get good-looking photos from the towboat.
Shoot from the center of the boat, not to the left or right. This way the rider is always the same distance from you and you won�t have to worry about changing your focus at all. Once the focus is set on the rider, you can take pictures for the whole run without worrying about pictures being soft or not.
Remember, the focal length of your lens will affect the depth of field of a picture. When you�re shooting from the boat with a zoom lens, f2.8 creates too shallow a depth of field � only part of the rider will be sharp in the picture. Open your aperture up to f4 when shooting from the towboat, this way the rider will always be sharp, but the background will still be soft.
Mix it up. Don�t always shoot horizontally or vertically � use both. Use the rule of thirds in different ways. Zoom in really close to shoot tight and get the rider to fill up a good portion of the frame. A lot of dead space can kill a photo.
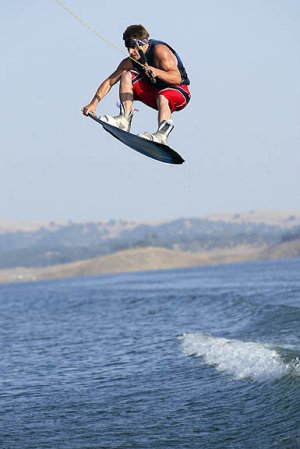
Cody Ramsey, Lake McClure
ISO 200, 1/1000 sec @ f5.6
When shooting vertically from the towboat it is usually helpful to keep perspective of the water, especially when the rider is going huge like Cody is here. If I had shot this horizontally and still wanted to keep perspective of the water, I would have had to zoom way out, which would have made Cody really small in the frame and he would have been surrounded by a ton of dead space.
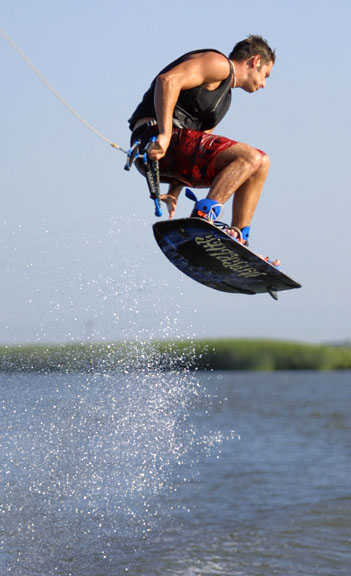
Alex Jubb, Cali Delta
ISO 100, 1/800 sec. @ f2.8
Don�t think that you can only get good pictures when a rider is in the air. Just because the subject isn�t doing a trick, doesn�t necessarily mean you can�t get a good photo. Always keep your camera up to your eye and follow the rider. When shooting from the towboat you don�t always have to have the rider riding directly into the sun to use the �golden hour� of light. Using sidelight can create a strong image, as well. Backlighting/silhouetting the rider can also be very cool from the towboat.
Alex Jubb, Cali Delta
ISO 200, 1/800 sec @f2.8
Shooting tight can still create cool images, even without the perspective of the water. Some nicely lit clouds during sunset help, as well.
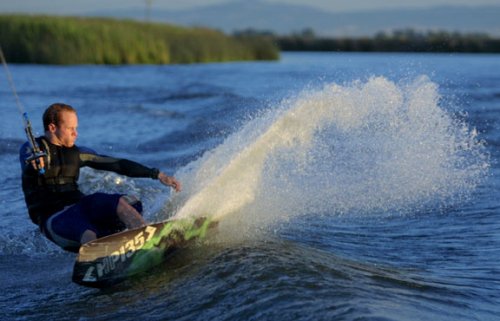
Dave White, Cali Delta
exposure ISO 100 1/2000 @ f2.8
Fill the frame with the rider. A tight photo like this one of Dave keeps perspective of the water, has very little dead space, and shows some peak action. The key to getting good, tight photographs is to pan your camera with the rider. Don�t hold the camera in one spot and wait for the rider to enter the frame before firing � that�s just downright dumb. Pan with the rider and keep him/her in the part of the frame you want and then fire.
Remember, these are just suggestions for shooting from the boat. As you can see I screw up all the time and shoot at f2.8 when I shouldn�t be. You don�t have to shoot tight or vertically or any specific way at all. Mix it up, try different things and see how the results turn out. Climb up on the tower and shoot from up there if you feel like it (make sure you�re the only boat on the water and the conditions are glass, first). There are thousands of ways to take pictures from a inside the towboat alone, my biggest suggestion is to not get stuck doing it one specific way. Even if you think something might not look good, take it anyway and see.
*Note: chase boat shots from directly behind the rider can be very dangerous! These shots should only be attempted with highly skilled riders and drivers. A boat doing 24mph does not have time to slow down should the rider somehow fall in its path. Please do not attempt follow chase boat shots without professional level riders and experienced boat drivers.
Matt Medved, Lake Shasta
ISO 200, 1/1600 sec @ f3.2
Mike Ennen, Delta
ISO 200, 1/1000 sec @f4.5
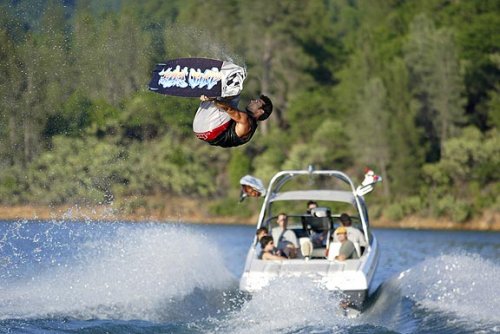
Mike Schwenne, Lake McClure
ISO 200, 1/2000 sec @ f4
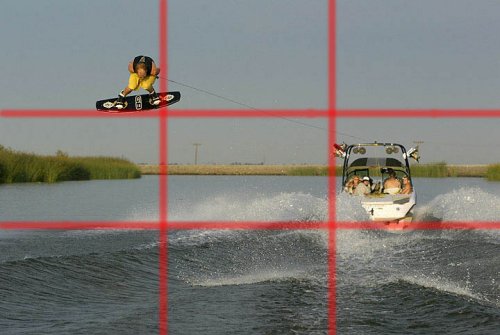
Framing the picture: One of the most important aspects of a good photograph isn�t necessarily the lighting, the angle, or the settings on the camera. These things can make a good photograph, but often times the composition of an image is what makes it great. If you can combine good light with a unique angle and compose the frame well, you will have a gorgeous photograph. Many photographers will tell you about the rule of thirds. The rule of thirds is designed to keep the subject you are shooting out of the middle of the frame, where it can seem stagnant and boring. Split the frame into thirds on both vertical and horizontal lines and you will have something that looks like this:
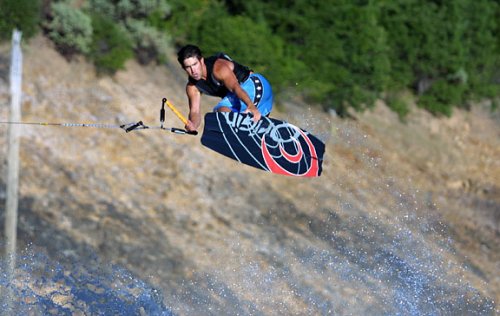
By using the rule of thirds, especially when the rider is not taking up much of the frame, the picture becomes much more dynamic. Imagine how boring this photo would look if I had put Aaron right in the middle of the frame when I fired my camera � there would be a ton of sky, very little water, and almost no boat in the frame. Now I know what you�re saying, �How can I use the rule of thirds if the auto-focus of my camera is right in the middle and the rider is off in a corner?� Here�s the answer: manual focus. I know it can be tough, but with practice you will get used to it and your photos will start to look amazing. If you absolutely have to use auto-focus, many cameras have different spots you can select to be the auto-focus sensor. Try using one off to the side or a corner rather than right in the middle. Here is an example of a bad picture because I used center-weighted auto-focus. As you can see there is no perspective of the water � the rider kinda looks like he is just floating through the air. The light and angle are still good, but the photo is missing something in the composition � the water.
Ian Kirk, Lake Shasta
ISO 100, 1/2500 sec @f2.8
Wakeboarding is a vertical sport, so it is often good to keep some perspective in the picture that way the reader can see how high the rider is going. To do this, whether you�re shooting vertically or horizontally, you�re going to want to keep the rider towards the top of the frame. Of course this doesn�t mean you have to use the rule of thirds in every photo you take, or that you have to keep perspective of the water every time the rider you�re shooting jumps. Fortunately, wakeboarding is an action sport and intense action can often times still make for a great photo, even when it might seem compositionally bland. Keep in mind these are just suggestions. One photographer might compose a photograph differently from another as they might see a situation differently or have a different vision of what they want the final outcome to look like � maybe shooting vertically instead of horizontally, etc. This is the great thing about photography. No two photographers are the same - each has his/her own style. Much like wakeboarders have their own individual riding style, photographers have their own vision and shooting style. Don�t be afraid to experiment and try new things. The next few suggestions might help you with this.
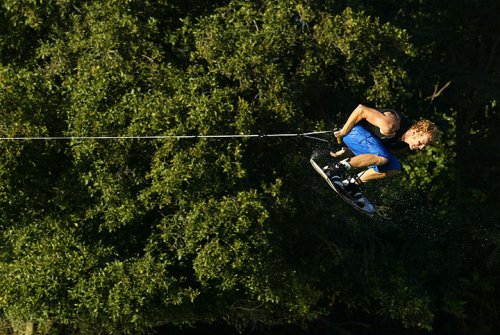
Aaron Aubrey, Cali Delta
ISO 200, 1/1000 sec f5.6
Not all photos have to follow the rule of thirds or keep perspective. Be creative and try different things. This picture of Aaron Aubrey is using the rule of thirds, but there is not perspective of the water. I wanted the whole background to be the trees Aaron was riding next to along the shores of the Delta, so I panned my camera up with Aaron as he got air.
Creativity (try something different): There are an infinite amount of ways a photographer can make an image unique. Here are a couple ideas you might want to try.
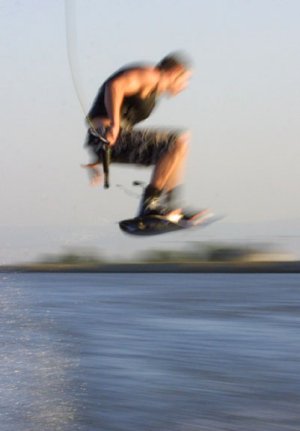
Blur: using blur can be an effective and different way to show the high-speed and intense action of wakeboarding. Slowing down your shutter speed significantly will leave the film/sensor exposed longer, thus picking up the motion of the wakeboarder. Here is a shot from the California Delta of a 360 shot at 1/30 sec.
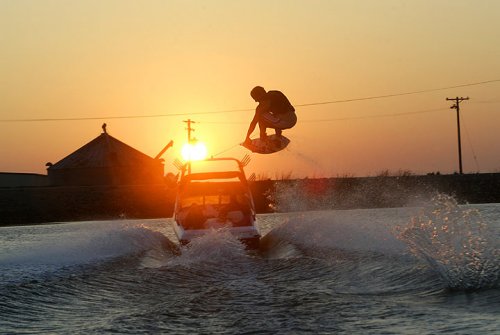
Silhouette: the silhouette is common, but can still make for a very powerful image. As you might know, when shooting directly into the sun your pictures can end up with lens flare � the big circles of light running across the frame. To prevent this while trying to shoot a silhouette you should use a high f-stop like f16.
Aaron Aubrey, Cali Delta
ISO 800, 1/500 sec @ f8
Flash: using a flash can provide for some very cool, unique images. Flash can be especially great just before sunrise and just after sunset, so there is still light in the sky, but the flash is the main light source in the image instead of the sun. A flash or multiple flashes can be used in so many ways that I can�t even scratch the surface. The best advice with a flash is to understand how it works and affects an image, then get out there and fool around with it. Here�s an example of using a flash from a chase boat after the sun had set. I metered my camera for the sky so I would retain the orange and blue sky, then used the flash to fill in the rider so he would be lit, rather than silhouetted.
The Background: A cool background can make a good photo extraordinary. As you�re riding around your lake, river, bay, or other body of water check out the shoreline and look for things that would look cool in the background of a photograph.
Equipment: despite what you may think, this should actually be the least of your worries. Just like the brand or year of a board doesn�t make a wakeboarder, neither does the brand or year of camera equipment make the photographer. Work with what you have and master it until you feel making an investment in camera equipment is the right thing to do. Obviously you might be limited from some things if you don�t have specific items (i.e. a flash for low-light situations, or a water housing for tube shots), but that isn�t preventing you from making great pictures with the equipment you do have.
Typically wakeboarding photographers will have a range of lenses, a couple of camera bodies, a couple of flashes, and some other gizmos in their bag of tricks. But, this is their office so to speak and what they make their living off of, so they need to have all of it. Here�s a fairly typical camera bag for pros.
Camera 16-35mm f2.8 � this is a wide-angle lens. I use it for tube shots, when I�m floating in the water, or on land up close to an obstacle like a slider. 28-70mm f2.8 � this is a midrange lens. I don�t use it as much as my others, but I do use it when doing extremely close chase boat shots (i.e. 6-10 feet from the rider). 70-200mm f2.8 � this zoom lens is the workhorse of most pros. It can be used from chase boats at all angles, from within the towboat, or pretty much anywhere else. 300mm f2.8 � this is probably the least needed out of everything in a pros bag, and isn�t found in everybody�s (including mine). It is great for shooting from land, or if you want to shoot really tight from a chase boat or in the towboat. 15mm fisheye f2.8 � fisheye lenses provide unique images and can be really cool when used correctly. They are often used with tube shots, both in front of and behind the rider. They can also be used on land when up close to objects like sliders.
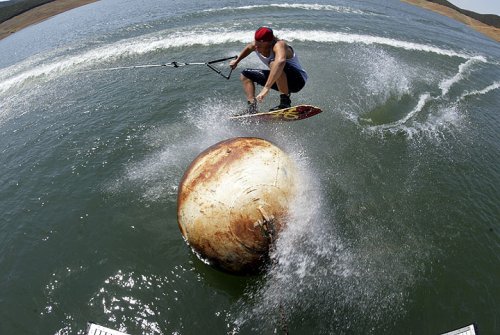
The fisheye lens can be great for up close shots.
Mike Schwenne, Lake McClure
ISO 200, 1640 sec @ f8
Flash � flashes are great for low-light situations, or adding different affects to images by using them off the camera with remotes. Light meter � These aren�t as essential anymore with the advent of digital photography (because now you can literally just look on the back of the camera to see if you got the shot), but they are still good tools to have for the serious photographer as most are more accurate than the light meters built into cameras, which are often fooled by dark water or well-lit hillsides. A light meter is practically a must if you�re shooting slide film. Water housing � a must if you�re going to try shooting from a tube or as a sitting duck. Cameras and water don�t mix, if they did we wouldn�t need water housings. Tube � a good tube is essential for tube shots. Don�t inflate them all the way as you want it to absorb some of the rollers you might encounter, rather than springboard you off. I enjoy the large, flat tubes without any holes in them so I can crawl around and even kneel or quasi-stand to get different angles.
Have fun: Not much beats a day spent on the water. Warm weather, buttery water, hanging out with friends, listening to music, and riding are just some of the ingredients that make up the recipe we call wakeboarding. Hopefully with some of the tips and pointers written above, documenting all the fun with your camera can be a new part of the recipe. Remember to have fun. You�re not going to get magazine quality photos the first time you pick up a camera and take pictures of your buddies riding, but you�re probably going to enjoy doing it. The best way to get better at photography is to take more pictures. Film is cheap (it�s developing it that can be expensive sometimes�). If you use digital your learning curve is even lower. Just keep shooting. Before you know it you might be reading your name in the corner of a full-page photograph splashed across the photo section of mag. Good luck and don�t forget to put the board on and take a set every now and then!
Garrett Cortese hails from Northern California where he spent his childhood summers boating around the California Delta with his family. After his dad taught him to use an old manual camera when he was 12, Garrett decided photography was for him. Garrett�s work has appeared in Wakeboarding Magazine and Alliance Wakeboard Magazine, as well as ads and catalogs for various clients throughout the industry. During the summer months Garrett can often be found running around the lakes of Northern California shooting local riders, but most of the time he is on the California Delta taking pictures, riding, and enjoying life. Garrett�s website can be visited at www.gacphotos.com and any questions concerning his photography or picture-taking in general can be directed to his e-mail address: garrett@gacphotos.com.
All words and photos copyright � Garrett Cortese, 2003. This article and the images and words contained within may not be copied or used in any way, shape, or form without written consent of Garrett Cortese.